This year I got selected for the Google Summer of Code program. For the next three moths I will be working with Biomedical Informatics, Emory University, in particular on their Data Integration Middleware called Bindaas. You can read more about my proposal and the organisation here.
This blog post is to document my progress through the weeks. I will keep updating this post every week. So without further ado
Security Enhancements to Bindaas
Week 0
May 6th - May 26th
After getting done with my university examinations, I decided to start writing a few lines of code, even before the official coding period began. I have a better understanding of the core modules as a result.
Relevant commits can be found on the gsoc-week0 branch.
The pull request for the same is #72
Completed Tasks
- Start this blog
- Fix backward compatibility issue with MongoDB provider
Pending Tasks
- Finish writing the BigQuery Data Provider
- Ensure the JWT Manager can support basic CRUD operations
In reference to point 1, BigQuery is a RESTful web service from Google for working with large datasets using a SQL like syntax. Basic code to use BigQuery as one of the data provider has been added. It’s not functional as of now as there seems to be a conflict with the ServiceAccountCredentials package from google’s oauth2 library. Others too have reported issues with using this library in a OSGi framework. As soon as this conflict is fixed, logic for querying data can be added.
All commits can be tracked in the bigquery-data-provider branch.
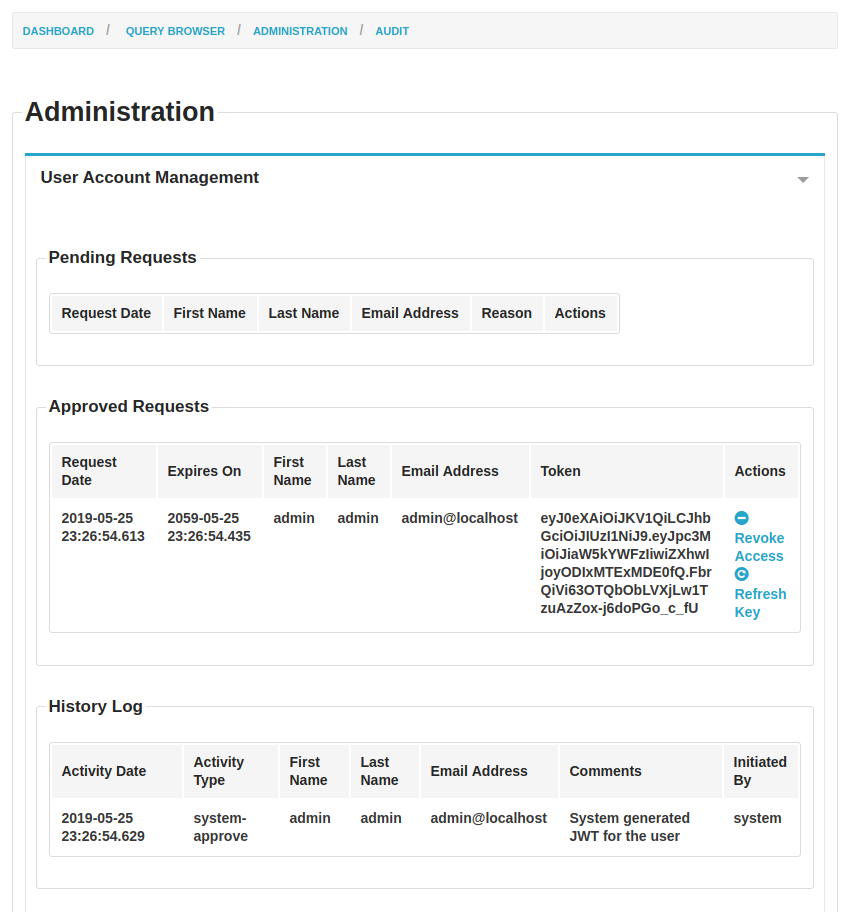
In reference to point 2, a basic JWTManager has been added for creating and managing the tokens. I have decided to use the java-jwt library (more on this in the design updates section below). As of now a token is created every time a user logs in and can be viewed on the dashboard.
All commits can be tracked in the gsoc-week0 branch.
Design Updates
I have added a new package for JWT as
├── edu.emory.cci.bindaas.core.jwt
    ├── DefaultJWTManager.java
    ├── IJWTManager.java
    ├── JWTManagerException.java
    └── Token.java
The tokens objects are created and managed by the DefaultJWTManager. As discussed above I have used the java-jwt library for creating the base64 encoded tokens. I decided to use it for the following reasons:
- Easy to use syntax with convenient method definitions
- Maintained and updated regularly
- No dependency issue when importing the library
I am also leaving FIXME comments in the code so that I can track broken code and ensure its fixed before merging into the main branch.
Upcoming Week Plans
I plan to finish writing basic CRUD operations for the JWTManager and also implement the BigQuery Data Provider. I also plan to finalise the implementation details of the JWTManager after discussing it with my mentor and other community members.
Week 1
May 27th - June 2nd
The past week was a successful one as I was able to get my implementation of the JWT Manager running and was able to query data successfully from my local database.
Now you can query data in the following ways.
curl -X GET \
http://localhost:9099/services/project/provider/query/get_data1?api_key=bf8e1bad-05c5-4034-8100-b114290324b2&
curl -X GET \
http://localhost:9099/services/project/provider/query/get_data?jwt=eyJ0eXAiOiJKV1QiLCJhbGciOiJIUzI1NiJ9.eyJpc3MiOiJiaW5kYWFzIiwiZXhwIjoxNTU5NTA5NDg0fQ.jacm6huomHkRHJ5eLuxKPhU2TSd-STErDcQUNIsn-v8&
curl -X GET \
-H 'Authorization: Bearer
eyJ0eXAiOiJKV1QiLCJhbGciOiJIUzI1NiJ9.eyJpc3MiOiJiaW5kYWFzIiwiZXhwIjoxNTU5NTA5NDg0fQ.jacm6huomHkRHJ5eLuxKPhU2TSd-STErDcQUNIsn-v8' \
http://localhost:9099/services/project/provider/query/get_data
Relevant commits can be found on the gsoc-week1 branch.
The pull request for the same is #73
Completed Tasks
- Ensure the JWT Manager can support basic CRUD operations
- Basic changes to ensure both JWT and API_KEY protocols can work independently.
Pending Tasks
- Basic testing for new features added
- Making the SecurityTokenService work with JWT
- Finish writing the BigQuery Data Provider
In reference to point 1, I have started to make changes to ensure that the bindaas service can be authenticated by either JWT or API_KEY as per the configuration specified while starting bindaas. I have only tested out a few scenarios and I intend to do a more through check to ensure that everything is working the way it’s supposed to. You will find details about the changes I had to make in the design updates section below.
In reference to point 2, the user can currently make the relevant queries using the web console. A large portion of bindaas’ users do the same using the command line. This week I intend to integrate the SecurityTokenService to generate (single use?) tokens. Implementation details will be covered in next week’s design updates section.
In reference to point 3, I was unsuccessful in fixing the conflicts I was facing last week. This however, is a secondary task, and if it still remains pending this week, it will be added to my stretch goals list (currently empty).
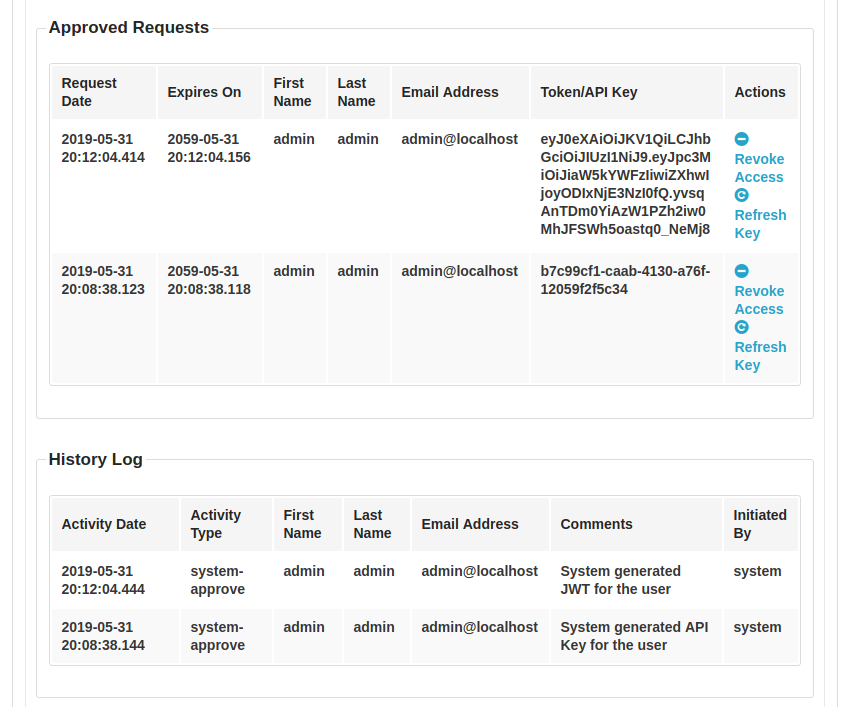
The following image is to contrast last week’s screenshot and to show both JWT and API_KEYs can be generated as per the configuration specified.
Design Updates
The current implementation is heavily coupled with API_KEYs as the authentication protocol. Trying to decouple it has certainly been a challenging and interesting task. Since different authentication providers can support different protocols, it only made sense that we specify both in the configuration file. Therefore I have added a new key as authenticationProtocol in the bindaas.config.json file.
For each authentication protocol (username/password, token or api keys) there exists a separate authentication provider. Therefore I added a new provider as OAuthProvider for JSON Web Tokens (JWTs). When initializing the instance, we now read the config file and set the appropriate authentication provider and protocol. For rendering the UI the code currently checks the authentication protocol and sets the context for the velocity templates accordingly.
{
  "authenticationProviderClass": "edu.emory.cci.bindaas.security.impl.DBAuthenticationProvider",
  "authenticationProtocol": "API_KEY"
}
{
  "authenticationProviderClass": "edu.emory.cci.bindaas.security.impl.OAuthProvider",
  "authenticationProtocol": "JWT"
}
Above are two valid configuration that can be set in bindaas.config.json. Other permutations are “valid” as well but JWT (for example) has not been implemented with DBAuthenticationProvider (for example). These two are the only configurations where authentication will work as other authentication providers have been deprecated.
Upcoming Week Plans
I plan to integrate SecurityTokenService with the logic I have written for generating access tokens. After a basic implementation is done I will do some testing for all features that will be completed by next week.
Week 2
June 3rd - June 9th
I made good progress this week, by updating the trusted-app-client to support JWTs. We also got a lot of code reviews done and had around ~2000 lines of code merged into the bindaas repository (on the add-jwt-token branch).
All commits from now on can be tracked on the add-jwt-token branch.
The pull requests for the same are #74,#76,#77 & #78
Completed Tasks
- Make trusted-app-client support JWT
Pending Tasks
- Testing, testing and loads of testing!
- Proper documentation of all new features added
- Finish integration of JWT into the admin console (front end side)
Design Updates
The trusted-app-client was added when support for API Keys came to bindaas. This is why the client was written with only API Keys in mind. The client now supports JWT and has also been restructured in a way to support any further protocol additions to bindaas. Existing users will not face any syntax changes, although a new command line argument for protocol has been added. This argument is optional and assumes the value of api_key by default.
The endpoints for managing API Keys and JWTs have been renamed to more generic. These are internal to bindaas and do not affect it’s users. Specifically
- /listAPIKeys endpoint is now /listAuthenticationTokens
- /issueShortLivedApiKey endpoint is now /issueShortLivedAuthenticationToken
The difference in using the client can be seen below:
# Earlier client

> java -jar trusted-app-client-0.0.1-jar-with-dependencies.jar -action a \
-username admin -id demo-id -secret demo-secret-key -lifetime 360000 \
-url http://localhost:9099/trustedApplication -expires 12/12/2025

Server Returned :
{
  "api_key": "008b59a8-b5ab-40de-977a-426052fa276b",
  "username": "admin",
  "applicationID": "demo-id",
  "expires": "Fri Dec 12 00:00:00 IST 2025",
  "applicationName": "Demo Application"
}
# Current client without protocol argument

> java -jar trusted-app-client-0.0.1.jar -action a \
-username admin -id demo-id -secret demo-secret-key -lifetime 360000 \
-url http://localhost:9099/trustedApplication -expires 12/12/2025

WARNING: [protocol] not specified. Using default value of api_key
INFO: Server Returned :
{
  "api_key": "008b59a8-b5ab-40de-977a-426052fa276b",
  "username": "admin",
  "applicationID": "demo-id",
  "expires": "Fri Dec 12 00:00:00 IST 2025",
  "applicationName": "Demo Application"
}
# Current client with protocol argument

> java -jar trusted-app-client-0.0.1.jar -action a \
-protocol jwt -username admin -id demo-id -secret demo-secret-key \
-lifetime 360000 -url http://localhost:9099/trustedApplication -expires 12/12/2025

INFO: Server Returned :
{
  "jwt": "eyJ0eXAiOiJKV1QiLCJhbGciOiJIUzI1NiJ9.eyJpc3MiOiJiaW5kYWFzIiwiZXhwIjoxNzY1NDc3ODAwfQ.3gB7tb-Xsysm-So3kVD6_VX47qjK7TMTXiUtZNq_cIQ",
  "username": "admin",
  "applicationID": "demo-id",
  "expires": "Fri Dec 12 00:00:00 IST 2025",
  "applicationName": "Demo Application"
}
As you can see from the above code snippets, you can either get an api_key or a jwt depending upon the protocol you specify. The above code snippets however assume that the server was configured to use api_key in the first two, and jwt in the last code snippet. If there is a mismatch in the argument value and the server’s configuration, you get the following error.
SEVERE: edu.emory.cci.bindaas.trusted_app_client.app.exception.ServerException: {
  "error": "Authentication protocol in request does not match with server's configuration"
}
The same logic is applicable for all four operations supported by the client, i.e adding/revoking a user, issuing a short lived token and getting a list of tokens.
Upcoming Week Plans
As per my project proposal I will now implement scope based access. I will also be testing my code for a few days and will try to update the documentation for all the features I have added/modified.
Week 3
June 10th - June 16th
I spent the last few days testing out all the features that have been added so far. I am happy to share that there were no major bugs and an alpha release is on the horizon!
As always relevant commits can be tracked on the add-jwt-token branch.
As a side task, I also configured continuous integration for my repository. You can have a look at the travis-ci branch.
Completed Tasks
- Proper testing of features added/modified
- Adding trusted-client-app to main pom.xml for distribution and packaging
- Fix web-console UI to show protocol dependent terminology and features
Pending Tasks
- Official documentation and guide to use the new features
Design Updates
No core modules were updated this week. Minor changes have been made to the UI. From now on you will only see, either JWTs or API KEYs in the administrative section of the web console, depending on your configuration. The labels will also change accordingly.
Upcoming Week Plans
We now move on to the next phase of my project where new features like scope based access and rate limiting will be added. In this regard, I will be having a discussion with my mentors, Pradeeban & Ashish, where we will iron out the next steps and design changes to be made to bindaas.
Week 4
June 17th - June 23rd
I have officially spent a month working on Bindaas now! Basic functionalities to support JWTs have been added. We now move on to managing and restricting access to Bindaas.
As always relevant commits can be tracked on the add-jwt-token branch.
Completed Tasks
- Add authentication via Google Sign In.
Pending Tasks
- Limiting access to features based on roles assigned to users
- Official documentation and guide to use the new features
Design Updates
As per last week’s discussion we will allow users to sign in via their Google accounts. Their roles will be fetched from an LDAP server and access to features will be limited accordingly. The web console was designed to be used by administrative users only. Since we will now allow non administrative users to login, there will be changes to show limited features. The directory structure that we will be using to maintain and query records is as follows:
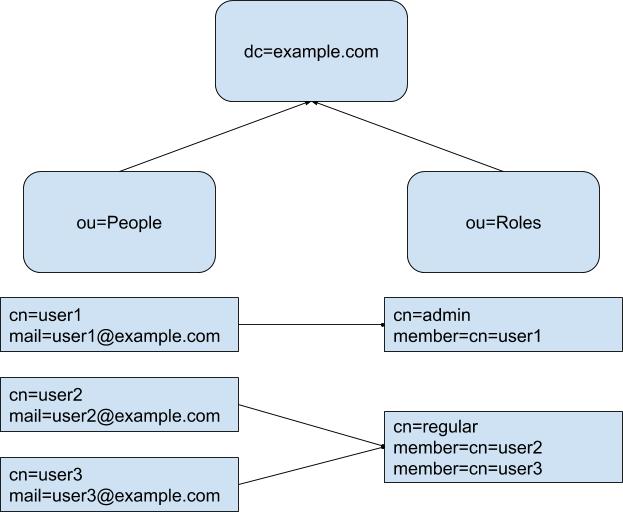
The above is a temporary structure and we might move forward with a custom schema. We will only need to update the queries if we decide to change the directory structure in the future.
Upcoming Week Plans
Since I have never worked with LDAP directories before, I might not be able to finish adding the features in the next few days. I also need to spend some time in integrating Keycloak with my LDAP server.
Week 5
June 24th - June 30th
I continued working on adding authentication and authorization mechanisms to Bindaas. This week also had the first phase of evaluations and I am happy to share I passed.
As always relevant commits can be tracked on the add-jwt-token branch.
Completed Tasks
- Role based view for the web console.
Pending Tasks
- Access control on databases supported by the providers (primary focus on Mongo)
- Official documentation and guide to use the new features (long term goal)
Design Updates/Discussions
Right till the point of writing this blog, I have been looking at proper authorization mechanisms. Our end goal is to give users access to different subsets of the data with different roles. So user A might be able to read and modify collections X and Y, whereas user B might only be able to view collection Y.
Mongo fortunately allows us Role Based Access Control for our collections. For this we can either chose from a list of predefined roles or create our own as:
db.createRole({

    createRole: "role-name",

    privileges: [{
      resource: { db: "db-name", collection: "collection-name" },
      actions: [ "insert","update","createIndex", "createCollection" ]
    }],

    roles: [{
      role: "read", db: "db-name"
    }]

})
After creating these roles we can create different users as:
db.createUser({

    user: "username",
    pwd: "password",
    roles: [{
      role: "role-name", db: "db-name"
    }]

})
Once we have created these users we can share the credentials (the username/password/db combination is exactly what is required while creating a MongoDB provider with authentication). This step will restrict the user’s activity to their roles.
The most important point to note is that these mechanisms only work across a collection. Ideally we would want to break down our database into multiple such collections to facilitate role based control. This however, will be a problem for a lot of existing users of Bindaas who are working with large datasets with different schemas. These users would have to restructure everything, add new roles and users which is quite a big task to undertake (with chances of error and a potential performance hit).
On a related note Mongo also provides authentication/authorization via a LDAP instance. The functioning is more or less the same as discussed above. We have to create users and role groups in the LDAP instance and corresponding users in the Mongo instance. Contrary to the highly technical (and at times difficult to understand documentation of Mongo), you can have a look at this well explained article in the documentation: Authenticate and Authorize Users Using Active Directory via Native LDAP
A second approach to all this is to move the authorization part to the Mongo provider level. As an example to how this might be achieved, consider the following hash map:
{
user-role1="mongo query which returns all the possible entires user1 can access",
user-role2="mongo query which returns all the possible entires user2 can access",
...
}
These roles can be set in the LDAP instance and when a user logs in we can get its corresponding role. After that it is as simple as running two queries - one the user provides and the other corresponding to its role, and finding the intersection of both. The only issue is that writing such queries for the hash map might be difficult. This approach is good for those users who don’t want to restructure their mongo collections and where the type of roles will be limited. This approach is a novel idea and I haven’t found any discussions on this so far. I am not sure if it will work correctly in all use cases so if you find any issues, do let me know.
Upcoming Week Plans
The aim for this week will to be discuss the ideas above, find and resolve issues and then start implementing them. Ideally the entire authentication/authorization process should be finished by end of this month.
Week 6
July 1st - July 7th
After discussing the appropriate method for adding an authorization flow, I started working on it and also made minor changes/fixes to the authentication flow.
As always relevant commits can be tracked on the add-jwt-token branch.
Completed Tasks
- Get role from authenticated user to mongo provider level
Pending Tasks
- Complete authorization flow for mongo provider
Design Updates
Since making changes to existing databases would not be feasible, we decided to implement authorization at the provider level. The user can list out roles and queries specific to those roles. These will be stored in <role,query> multi map and the results will also be cached for improved performance. Further implementation details can be found in the second apporach of last week’s design updates section. We will also be adding a “Enable Authorization” flag to give freedom to the user and to make it backward compatible as well.
Upcoming Week Plans
I plan to finish basic authorization checks this week and then test it out by creating a random database locally.
Week 7
July 8th - July 14th
I added authorization checks for mongo provider this week. We still need to find a better way for doing these checks, but other than that everything is in place.
As always relevant commits can be tracked on the add-jwt-token branch.
Completed Tasks
- Added authorization check for mongo queries
Pending Tasks
- Replace these checks with more efficient ways, but at the provider level
Design Updates
I have added a enable authorization checkbox when we create a mongo provider. This has been kept specific to mongo by design because we aren’t rolling out authorization for other data providers at the moment. After enabling authorization the user can specify roles and their corresponding queries. We then parse and run these queries to get a list of authorized _ids. So now whenever the user wants to fetch/update documents we will just check if the _ids of the documents in question are a complete subset of the authorized _ids we had below. The above method is definitely optimal and we are looking for alternatives.
Upcoming Week Plans
Discuss and implement a better authorization check mechanism. This will be followed by extensive testing.
Week 8
July 15th - July 21st
After having discussions and a demo last week, we have decided to use auth0 which is basically a AaaS (Authentication as a Service) platform. This can handle multiple identity providers and generate tokens for custom endpoints as well.
Since this approach is slightly different I have created a new branch as add-jwt-token-new.
Completed Tasks
- Configuring auth0
- Client side authentication
Pending Tasks
- Handling login and authentication server side
- Verifying tokens from auth0 when calling endpoints
Design Updates
To make auth0 work with bindaas we can configure it as:
- Create a new account and register a new tenant (bindaas.auth0.com is available).
- Create a new Application and configure it for Authorization Code Flow.
- Create a new API for the bindaas endpoints.
- Configure Connections for identity providers.
- Additionally you can add custom JS logic to modify the access token using Roles.
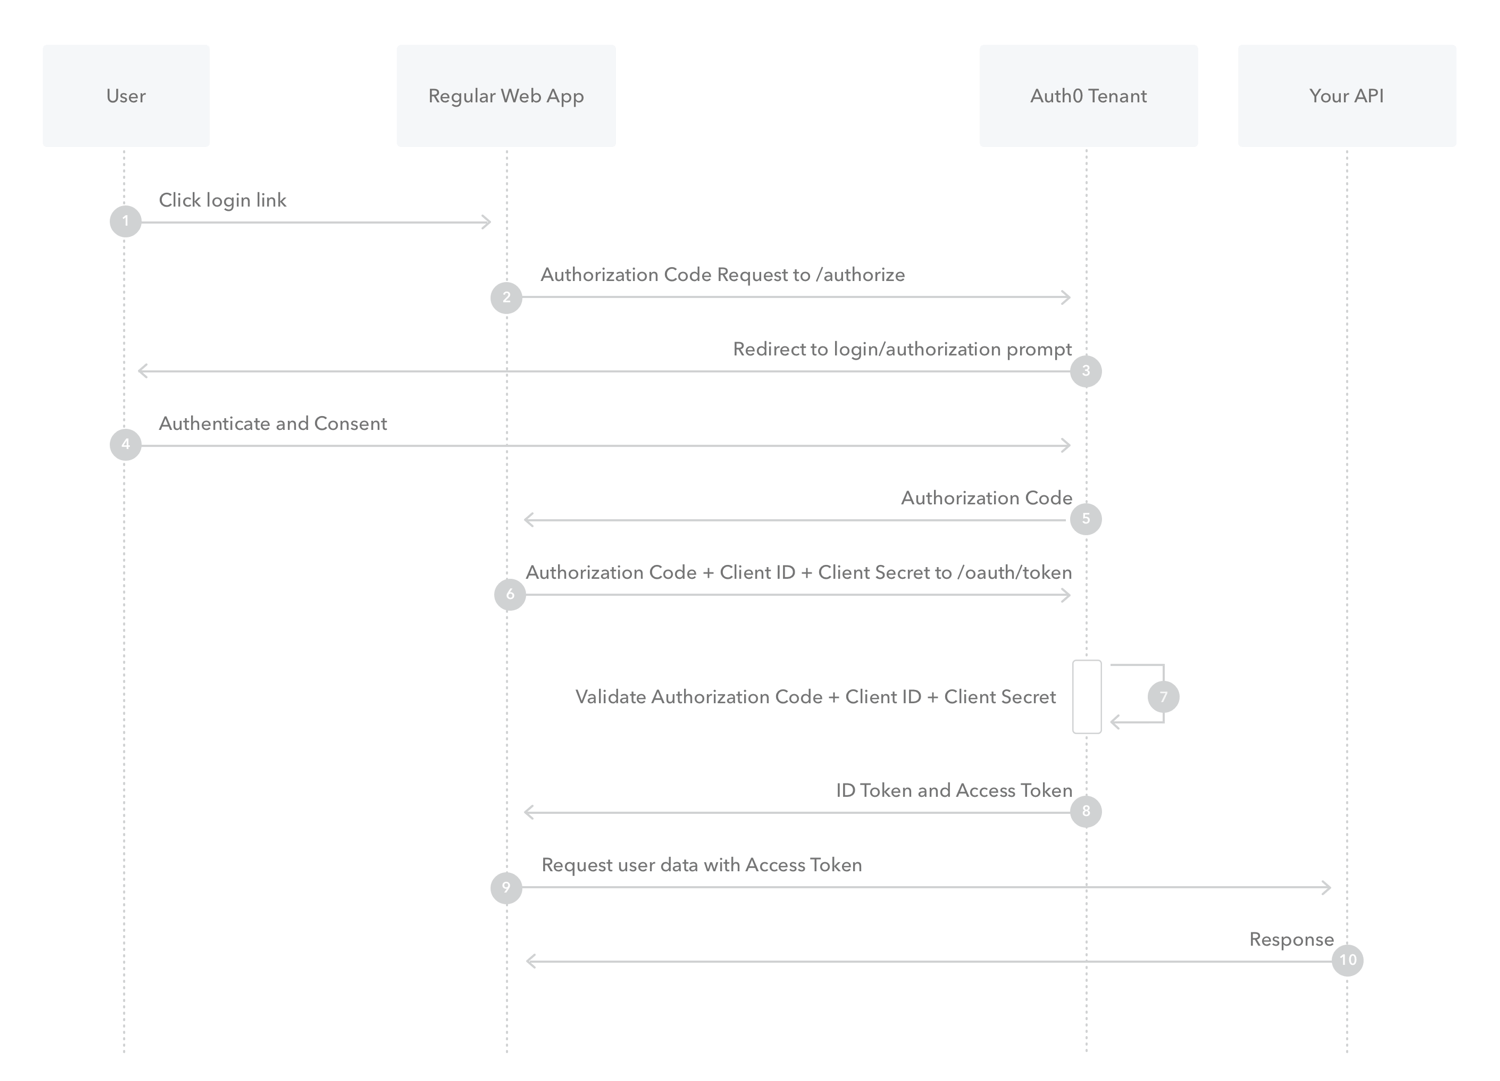
We have implemented the Authorization Code Flow which ultimately returns a access token to use with the custom api we configured above. We will then verify these tokens using RSA256 (public-private key encryption) whenever any endpoint is called. This will be done between steps 9&10 in the diagram below. These tokens will also have a role which will be used later for authorization checks. The good thing about this is that we have decoupled the generation of tokens from bindaas and can add the auth0 login on any service which runs on top of bindaas. This way we won’t have to log into bindaas to get a token and the service itself can make the required endpoint calls.
Upcoming Week Plans
I will work on completing authentication so that we can call endpoints by using tokens from auth0.
Week 9
July 22nd - July 28th
We have finished the integration of auuth0 with Bindaas this week. Both the front end and back end are fully functional and support all the relevant features as before. This week also had the second phase of evaluations and I am happy to share I passed.
As always relevant commits can be tracked on the add-jwt-token-new branch.
Completed Tasks
- Updating back end logic to support and verify auth0 tokens
- Updating trusted-app-client
Pending Tasks
- UI aspect of displaying long access tokens from auth0
- Configure LDAP client for auth0
- Assigning role to every user
Design Updates
At this point, I would like to reiterate that Bindaas can be configured in two ways. One will make it run like it used to, using API KEYs. This supports username/password and LDAP authentication but certain configurations have to be changed every time. The other way uses auth0 to generate access tokens for successful logins. This supports multiple identity providers and ldap. No changes have to made to switch between providers. The valid configurations for bindaas.config.json are:
{
  "authenticationProviderClass": "edu.emory.cci.bindaas.security.impl.DBAuthenticationProvider",
  "authenticationProtocol": "API_KEY"
}
{
  "authenticationProviderClass": "edu.emory.cci.bindaas.security.impl.OAuthProvider",
  "authenticationProtocol": "JWT"
}
If using trusted-app-client with JWTs, you can only revoke and list users as the other two operations (authorizing a user and creating a short token) require generation of access tokens which is now handled by auth0. Therefore the user will have to login using the web-console. Ideally the login will be placed on the application running on top of Bindaas. So you can directly use the access token from the login to call Bindaas’ endpoints.
Upcoming Week Plans
I plan to finish adding roles to every login to be used for authorization checks and then start working on the authorization part itself.
Week 10
July 29th - August 4th
We are now moving towards the final few weeks of GSoC. I spent the week making changes to the code so that it could be merged. The auth0 sign in can be configured via the properties file as described in the Design Updates section below.
As always relevant commits can be tracked on the add-jwt-token-new branch.
Completed Tasks
- Add config file for auth0
- Fixes as per FIXME comments
Pending Tasks
- Make role accessible to all data providers
- Documentation and guides to configure everything
Design Updates
After creating an account on auth0, please note down the domain, client id and audience and set it in the bindaas.auth0.properties file as:
auth0.clientId=your-client-id
auth0.audience=your-audience
auth0.domain=your-domain.auth0.com
Upcoming Week Plans
I plan to finish the authorization process this week so that I can focus on documentation the entire next week. This way everything can be wrapped up by 18th August.
Week 11
August 5th - August 11th
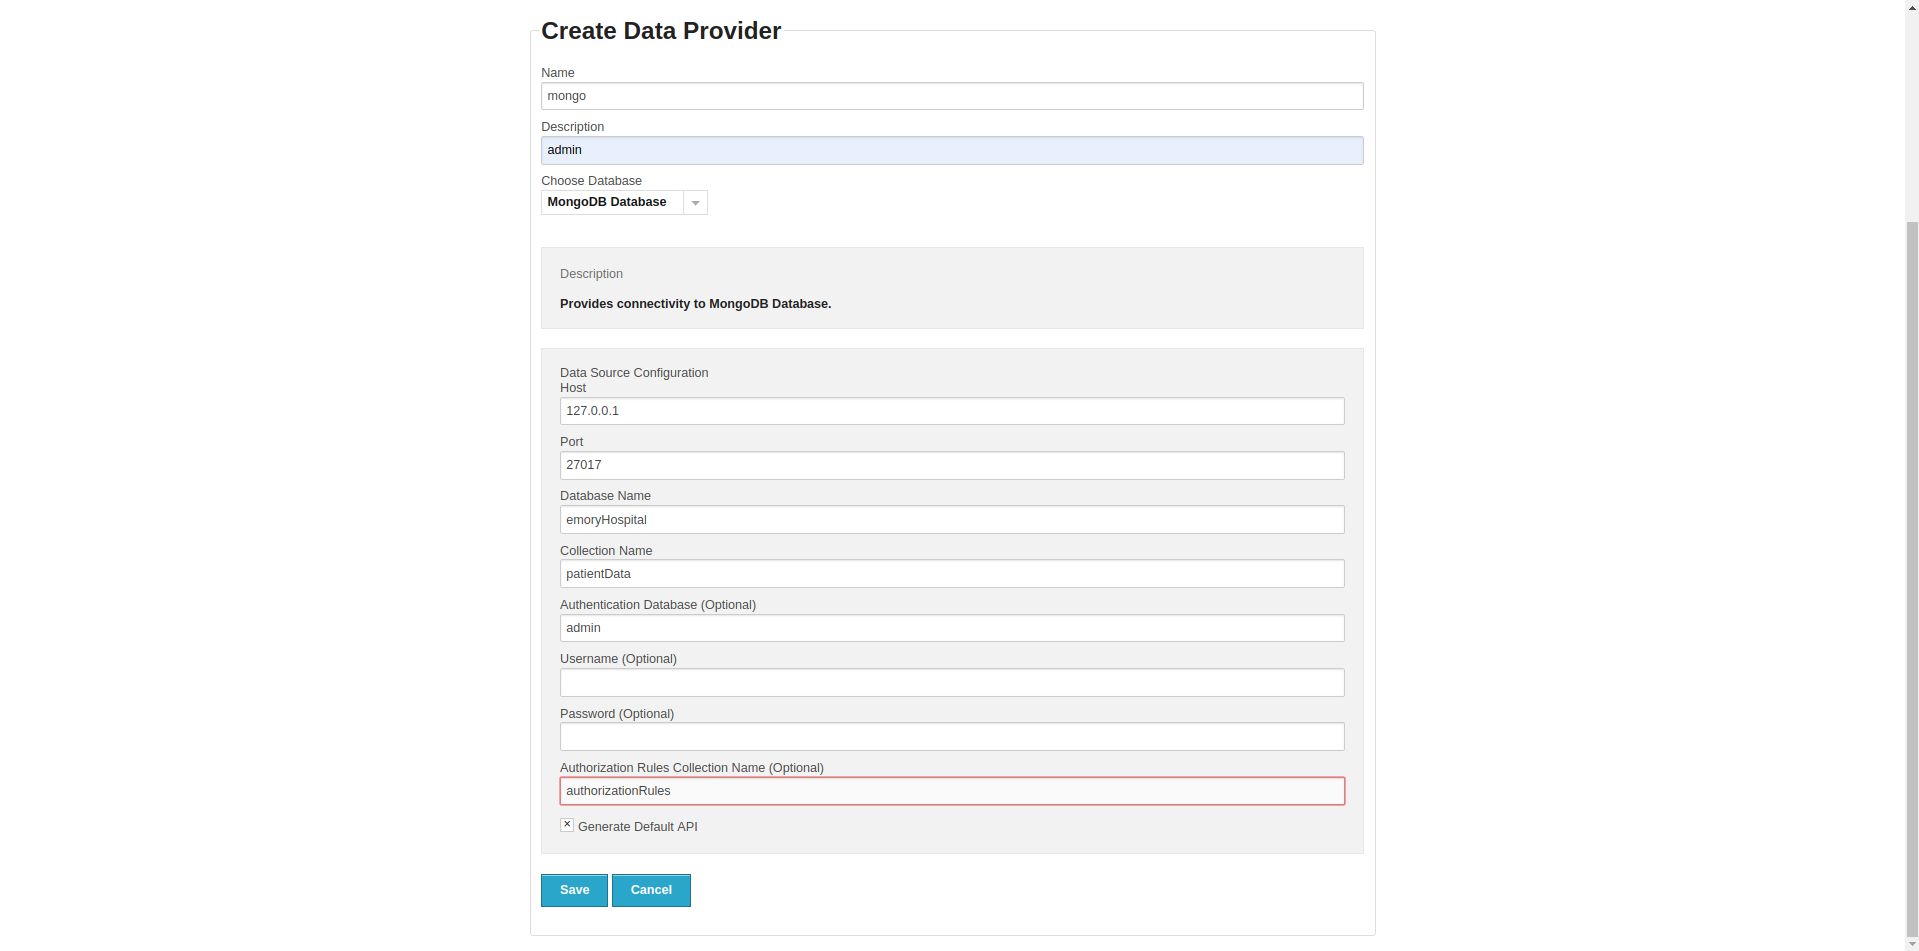
I was able to add authorization checks for Mongo queries this week. These can be enabld by specifying a authorization collection when creating a provider and can be used to limit access to parts of a collection.
As always relevant commits can be tracked on the add-jwt-token-new branch.
Completed Tasks
- Authorization for Mongo queries
Pending Tasks
- Documentation/guides for all new features added
Design Updates
Authorization can be enabled by specifying the collection which has the project-role mapping. Authorization is diabled for older project files by default. Furthermore the collection must be in the following format (the name of the collection can be anything):
> db.authorizationRules.find()
{"projectName" : "sepsis-all", "roles" : "admin,dev,user" }
{"projectName" : "sepsis-admin", "roles" : "admin" }
Additionally the collection which is being queried must have the project attribute. For example
> db.patientData.find()
{"patientId" : "EH101", "name" : "John Doe", "project" : "sepsis-all"}
{"patientId" : "EH102", "name" : "Joe Shmoe", "project" : "sepsis-admin"}
Authorization can be toggled from the data provider’s configuration. As an example the user should enter authorizationRules as the Authorization Rules Collection Name when creating a new provider. An empty string will mean that authorization has not been enabled.
Upcoming Week Plans
All code has been added and will be merged over the weekend. The only thing left is to create a wiki which I will do in the coming week.
Week 12
August 12th - August 18th
I spent the last week of the official coding period in writing the wiki for all the work I have done over the summer. We will be releasing Bindaas v4.0.0 soon and you can find the release notes here.
With this weekly update we come to the end of GSoC. It has been an exciting and fulfilling experience. I would like to thank my mentors Pradeeban Kathiravelu and Ashish Sharma for their continued help and support. Do check my next blog post for a final update on GSoC.
Thanks for making it through the entire post. If you have any questions/suggestions do leave a comment below.